One of the most important aspects of a cannabis grow is providing your plants with (nutrient filled) water. As a beginner you might think that it’s just a matter of pouring some water on the soil of your plant.
However there are many different methods of watering your plants. Every method has it’s pro’s and cons and some are better to use after gaining some experience. Choosing a certain method often depends on the growing medium you are using.
In this section of the website, we will talk about all of them and why you should (or shouldn’t) use one particulair method:
Basic methods:
- Manually watering your cannabis plants
- Drip irrigation system
Hydroponic systems:
- Ebb and flood (flood and drain)
- Deep water culture
- Nutrient Filming method
- Aeroponics
Manually watering your cannabis plants
The most basic method is manually watering your plants. Just grab a watering can or bottle, mix your water with nutrients and water your plants one by one. It all sounds very easy but there are some things you need to think about! First of all, make sure your water is okay! Measure the PPM and PH and carefully and mix the right amount of nutrients with the water (You need to be very precisely with these kind of small amounts).
Manually watering your plants is pretty great when growing a few plants because you are fully in control and don’t have to reach far to water them. Next to that you decrease the chance of leaking tubes or systems.
However when growing lots of plants, it is not an option to water manually. It would take way to much effort re-filling your can for every plant and you wouldn’t have the opportunity to reach to all plants in the room. In that case you should go for an automated system!
Drip irrigation system
A little more advanced system to water your cannabis plants is using a “drip irrigation system”. This system takes some effort to set up, however it makes it possible to fully automate the watering process. Next to that, it’s possible to adjust the nutrient supply to your plants quite easily (based on the potency of your nutrient mix and amount of drops you’ll give your plants.
But how does it work?
An irrigation system consists out of multiple tubes, a pump, a water resorvoir and something we call “droppers” (emitters). These materials are often sold together in a set which makes setting it up pretty easy.
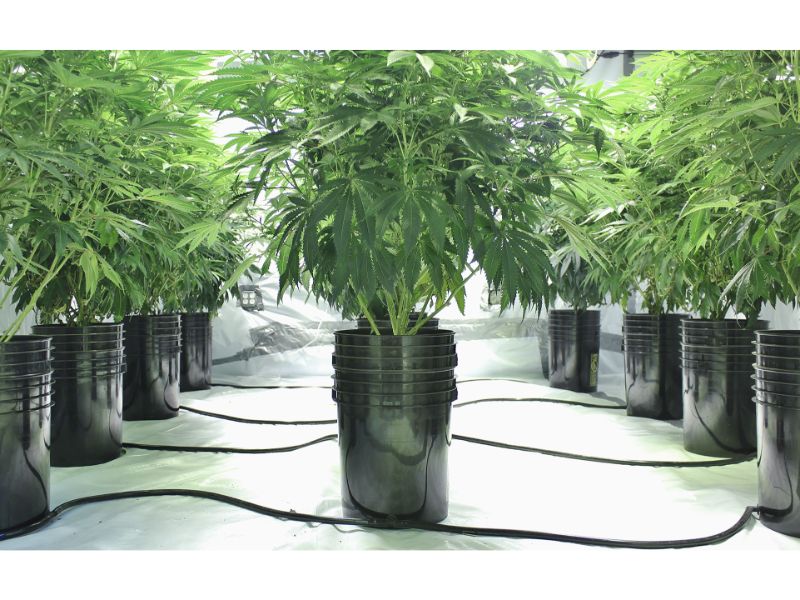
The intention is to pump the water from a water resorvoir to each plant. In order to do this you need to install 1main tube that is connected to the pump in the resorvoir. This tube will go all way through the growroom.
On this main tube, you need to connect multiple “side tubes” that end with “a dopper” (1 for every plant). This dopper turns the flow of water into a slowly drip mechanism. Eventually, you are able to pump the water through the main tube and let it flow to all plants using the “side tubes”. So you are able to water all plants by only 1 pump (seen on the image below).
The amount of water and frequency on when it’s getting pumped can be controlled by a timer. It takes a bit of experimenting and trying before you know how often and how long the pump should be on to release to admired amount of drips.
Once you find this out and set it right, your watering system will be fully automated (Only the water reservoir needs to be re-fillerd every now and then.)
Pro’s and Cons
Just like all watering systems, the irrigation system has some great benefits. However there are also some aspects that could be better found in other watering-methods. Take a look:
Most irrigation sets that are for sale come with a big variety of quality. Some contain cheap materials that will easily start to leak overtime, others will contain plastic that leaves traces of chemicals in the water. We recommend to spend a little more to get a good-working and safe product. (Look on the internet for reviews)
Hydroponics are a unique method of growing plants that can be done in multiple ways. The special thing about hydroponics is that you won’t use any soil at all, the main medium will be: Water!However, in some cases you will need to use a inert medium (to keep the plants and roots in place). Examples of these inert mediums are:
- Clay pebbles
- Rockwool
- Perlite
- Coco coir
When asking an experienced grower about hydroponics, they will probably be very positive about it. Generally plants that are grown using a hydroponics method will grow 30-50% faster and often gives you a bigger yield.
The reason for this is that the plant has directly acces to the water and nutrients (the roots are touching the water). So the water is able to directly enter the root-system of your plant without finding it’s way through all the soil.
Next to that, your plant will safe a lot of energy because it doesn’t have to search and grow through the medium to find water. Your plant will use this energy for it’s growth instead. Here are some other Pro’s/cons of a hydroponic grow:
In a hydroponic grow, there are many possibilities to choose from. Some are easier to build then others, but they are all very effective.To give you an idea about the possibilities, we listed up the most common Hydroponic methods below:
Ebb and flood (flood and drain)
The Ebb and flood method is a great way to water your plants but a little complicated to build. The way it works is already described in it’s name: It makes the water come and go (just like the ebb and flood in the sea). To make this work you need to be creative and have the right equipment.
First of all you need some buckets/planst that need to be installed in an (empty) water resorvoir. This reservoir needs to contain a water inlet and outlet, they will be connected with another reservoir that is being placed underneath the one containing the plants.
This second reservoir will be filled with nutrient mixed water + an air stone to aerate the water.
Now get yourself a pump and place it in the second (lower) water reservoir. This pump needs to fill the upper reservoir (that contains the plants) through the waterways described above.
Because the reservoirs are on each other, the water will flow back to the lower reservoir once the pump is turned off. Using a timer, you can flood the roots of the plant every now and then without continously subermergin them in water.
Image 2 shows how to water drains back to the lower reservoir. This happens when the pump turns off. you also see an overflow which works like an extra security if the water rises too high. (in that case the water drains back to the lower reservoir)
Deep water culture (DWC)
If you are a beginner to hydroponics, this is the cheapest and most easy method to start with. In the DWC method you will be growing the plants in an “open water” reservoir. The roots will stay in the same water 24/7 and you will be using an air stone to provide a supply of oxygen.
The plants stay above the water in an inert medium. This way, your plant get’s everything it needs without using too much energy to find it. This will result in quicker growth and bigger yields.
To start practicing DWC, you will need:
- some basket pots/buckets for your plant (Filled with an inert medium, like clay pebbles)
- A water reservoir with lid
- An air pump/stone.
You need to install the buckets through the lid of the water reservoir so they hang partially in the water once it’s filled. This way, you let the roots of the plant “hang” in the water as they grow. After that, place an air stone in the water and connect the pump, this provides your plants with a constant supply of oxygen that it really needs!
You can do this in 2 ways: “Hang” multiple plants in one bigger reservoir or use multiple smaller reservoirs each for 1 plant (so you are able to control the water-nutrient mixture per plant)
After setting up and filling the reservoir with water, it should look something like this:
Nutrient film method
Another creative but very effective watering system is called “Nutrient Film”. This way of watering lets you re-creative a flowing river that keeps giving fresh water to your plants. To build this, you might need some time, effort and equipment like this:
- 1 big water reservoir
- Bucket/ basket pots for your plants
- 1 tube that fits your amount of plants
- Water pump
- Air stone
The plants will be placed in a longer tube thats is angled a few degrees. This tube will be placed above the water reservoir.
In the water reservoir, there is an airstone and pump that pumps the water in one side of the tube. Because the tube is angled, the water will flow to the other side (using gravity) where it enters back into the water reservoir.
The roots of the plants will grow in the tube and will be exposed to the flowing water 24/7. This is good for the nutrients in the water and makes your plant grow quicker with bigger yields. A Nutrient filming system should look something like this:
Aeroponics
This method is probably the latest and most modern one of them all. To optimize the combination of hydration and aeration, misted water is being sprayed in the air around the root system. This mist will constantly moisture the roots while allowing them to consume huge amount of oxygen at the same time. That makes it one of the most effective hydroponix methods.
In thise case, the plants are being placed in buckets/net-pots in an inert medium like clay pebbles. These pots are placed/hanged in a tube/box that seperates the root system from the plant. Like this:
The area inside the tube is where the roots will be misted. It’s important to keep this closed as the mist could cause a too high humidity in the growroom (where the plants are).
Next to this tube, you will need;
- 1 water reservoir
- 1 water pump
- Some misters
- A few smaller tubes to connect your equipment
Add some nutrient mixed water to the reservoir and keep it +- half full. Then place a water pump in the water and connect it to the misters. Now install the misters in the plant-tube and make sure every mister is being placed underneath a pot, aiming directly at it.
Now make sure you will install the plant tube directly above the water reservoir, as the damp will collect and eventually flows back as water (this water can be recycled by catching it back to your water reservoir). A great tip is to angle the plant-tube slightly so the water flows back on 1 side.


