Bud rot (Botrytis cinerea) is a very common pest that many growers have to deal with. It’s a pest thats not only found on cannabis and it can be quite persistent. When noticed too late, it can really ruin your yield and affect other plants. The trick to deal with this type of mold is preventing it or treating it as soon as possible. In this article we’ll explain how!
Bud rot is a toxic fungal infection caused by “Botrytis cinerea” that will grow on/in your cannabis buds. The buds will start to rot and eventually die. Once the fungus is there, it’s very contagious and will spread to all other buds that are close to each other. Luckily, this process only works in the right environment which could make it easy to prevent or treat it.
Recognizing Bud Rot on a cannabis plant
Bud rot is something every grower wants to avoid. Like said, the first step for a treatment is recognizing it on time. This is very important. Bud rot could spread and grow really fast (in the right circumstances) and starts from the inside of a nug which makes it hard to see at first.
Once the rot is properly visible from the outside, your bud will be all rotten away from in. By inspecting your plants daily you could detect bud rot before this happens.
If you are on time, the first sign of bud rot is a white fluffy fungus like material on the outside of the buds. This is the early stadium of the fungus and perfect time to act now. However finding and removing this can be tricky as the white fluff is very small and fragile.
Once touched, it easily falls appart and get’s blown away. So once you detect it,take a good look inside the bud and you probably see dark/grey mushy plant material. This is bud rot!
Another first sign is the smaller leafs in between your buds turning yellow overnight. If you see that happen, immediatly tace action and inspect the particulair bud.
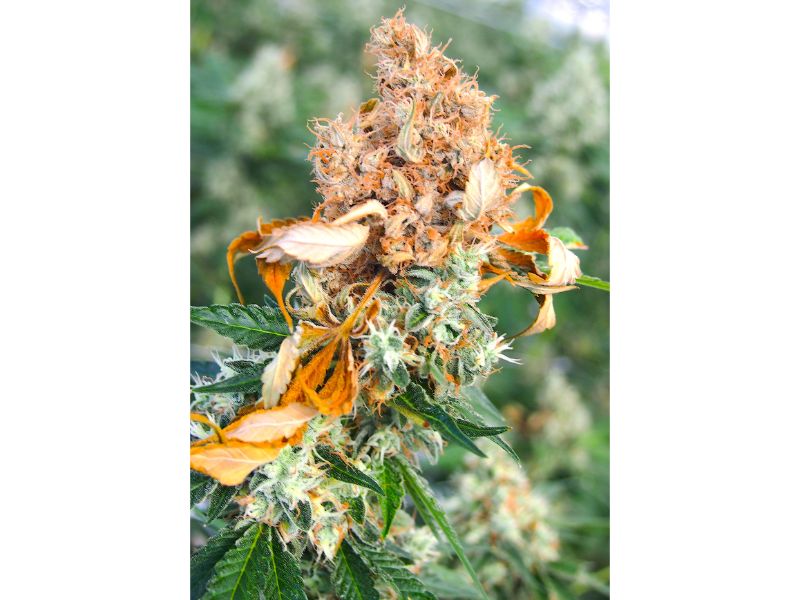
After the first phase, you might see the calyces in the buds become a little darker/grey and the leaves between the buds becoming brown and wrinkly. You will also see the first black spots appearing on the buds, these are new fungus spores ready to spread to other plants.
This is the moment the bud rot starts to break out. You will see these characteristics appearing more on different buds and plants. The inner of the most infected buds will already be rot, brown/grey and fall appart easily.
Some types of bud rot appeare more dark/black, other show signs of mushy grey buds. If nothing is done now it takes a matter of days the bud rot will take over complete buds leaving them brown/dark, dead and dried out.
What exactly causes Bud Rot?
Like mentioned before, healthy plants can be easily protect against bud rot. The mold needs a specific environment to stay alive after the spores have infected a plant.
Even with many fungus spores reaching your plant, they won’t have a chance to grow and evolve without the right circumstances. So let’s see what climate is perfect for Bud-rot:
What circumstances are perfect for Bud Rot?
Wet/Moist cirumstances.
This is probably the most important cause. Bud rot loves humidity levels over 55% or rainy periods. Big leaves touching each other or shaded spots can cause wet spots on your plant, perfect for mold.
No fresh air or stream of wind.
A bad circulation of fresh air on all parts of the plant (inside, lower and higher parts) will eventually cause wet, humid spots which attracts bud rot. Plants with lot’s of leafs could create humid “air pockets” in between them, what makes a good air circulation even more important. Sometimes defoliating the plant a little could help.
Cold temperatures (Everything under 20°C)
Cold temperatures are perfect for the Botrytis Fungus spores to germinate and grow in. However if the humidity is high enough, it’s no problem for this fungus to keep germinating at higher temperatures. Try keeping it at 24°C or 75°F and avoid temperatures below 20°C or 68°C.
Big Dense nugs
Too bad the Botrytis Fungus only shows up on your buds (once your grow is almost done). Thats why it’s called “bud rot”. Big fat cannabis buds are a perfect place for mold to grow. They can suck up lot’s of moist and stay wet because the inner side is not exposed to fresh air. Perfect place for mold!
Only one of these circumstances, in a longer period, will increase the chance on bud rot. However a combination of these will almost be a guarantee for the rot to spread and grow.
Bud rot is very contagious and like other type of fungus, it spreads by releasing spores in the air or on your hands. In a later stage of the bud rot, you will see black spots appearing that fly away easily. These are the spores that will land on new plants to start their fungus grow.
Remember to always wash your hands after touching an infected plant. Spores can stay on them and get on another plant, also make sure you won’t breath in these particles! These dust-like, fungus spores will most likely spread to your plants by:
- Air/Wind
- Water/Rain
Fungus spores can be easily carried to your plants. A little breeze, some rain or contact with animals could be enough for fungus spores to nestle on your plant. Next to that, the spores can survive a long time and in many conditions so it could affect your plant later on (once the circumstances are good).
Did you know: If your plant won’t be exposed to these fungus spores, it’s impossible for them to get infected.
How to prevent/treat Bud Rot?
To begin with, the most important part of treating Bud Rot is by simply avoiding it. This can only be done by offering the right environment and circumstances. Once it’s too late and your plants are already suffering from Bud Rot, You can only treat them by cutting away the infected areas and creating the right environment.
5 steps to create an environment that keeps bud rot out!
Keep a very close eye on your buds.
You should check them daily to spot the first signs of a Bud rot epidemic. Open the buds and look between them. Also see if you find any wet spots on your plants. Use this article to find the first signs of a Bud Rot infection.
Keep the humidity low on flowering period.
Like told before, a too high humidity is the #1 cause of bud rot. Make sure your humidity is always under 50%. If thats not possible, it will become very hard to treat. When growing outdoor it might be harder to control the humidity, However you could place them on a windy spot or keep the rain out using foil.
Take care of an good air circulation.
The only way to get the humidity in and around a plant lower is by providing a nicely devided wind off fresh air. When growing indoor, make sure you have an entrance/exit fan for fresh and old air. You could also add extra fans pointing towards the plants. Growing outdoor? Place your plants in a more open, windy area and out of the shade!
Consider the defoliation of extreme bushy plants.
Plants with lot’s of leafs will automatically attract wetness/ a high humidity. They will have less air circulation, lot’s of shade and leafs touching each other creating wet spots. Cutting some of the leafs off will prevent this from happening.
Avoid wettnes.
Next ot the humidity of the air, you need to make sure your plants are not wet due rain, watering or morning dew. Cover outdoor plants and don’t let them stand in the rain. Don’t overwater your plant leaving a wet puddle in your soil. Shake the morning dew off your plants daily. This all contributes to a lower humidity.
Choose a strain that fits your climate.
Not every strain is as vulnerable to bud rot as others. Depending on genetics, some strains are better to resist the growth of fungus. Try to avoid strains that are developed around the equator. There are more cold-resistent strains that flowers a bit earlier in the year, they’ll be ready before the Autumn rain.
The second step (If trying to avoid it doesn’t work) is recognizing it on time. In this article we show’d you the first signs of a Bud Rot breakout. Think about the white fluff, colouring bud-leafs and colouring of the bud. Once you have seen it a few times, you will recognize it quite easily.
So make sure to closely check your plants everytime your there. The faster you spot the signs and act, the more you safe from your yield.
Treating bud rot
If you are too late and the breakout is already a fact, there is only 1 thing to do. First adjust all climate controls in your growroom and make sure you have an environment that is not suitable for Bud Rot (described above). This will make it very hard for the mold to spread or re-grow.
Then start to cut away all the infected areas and buds. Even the smallest amount of mold/spores should be removed and everything that could be affected by the Bud-rot should leave the growroom/grow area. Also cut a small amount of good bud around the affected areas to prevent the rot from coming back.
However do this very carefully
Get some gloves, and use a fresh scissor to cut off the affected buds. Make sure the mold and affected buds never touches any other part of the plant! They contain spores that will be left and are able to re-grow leading to a new Bud Rot infection.
This often happens because a piece of mold falls of, or you touch the plant with the same fingers that touched the mold before. This way you would be helping the Bud Rot to spread.
However, without changing the climate-circumstances and creating a Mold-resistent environment, cutting away doesn’t help you anything and the Bud Rot wil come back quickly. There will always be some spores around waiting for the right moment to start a new epidemic.
Cutting your loses
If you are growing outdoors or don’t have the ability to adjust your climate settings. You might need to consider to cut your loss and harvest early. As riping your cannabis really improves the quality, it’s sometimes better to just cut them down and be happy with what you have.
Bud rot will always come back without changes in humidity/temperature/fresh fresh air and could eventually ruin all of your crops. By harvesting a bit to early, your buds won’t be riped well but hey, at least you have something

